

Desktop PC Build: Building it
Building it!
If you have not read the article on how I decided on the parts for my PC you can read it here, Desktop PC Build - Choosing Parts.
Once I purchased all the parts it was time to build it. This was my first ever PC build so I was a little nervous! But I followed the instruction for all the hardware components and it turned out well.
Step 1: Prepare the case
This involved taking the side panels off the case, screwing in the stand-offs into the correct holes (which align to the motherboard) and inserting the IO back plate. The IO back plate was a bit tough to get in and required considerable pressure, then once its in double check it is fully in each side needs to clip in.
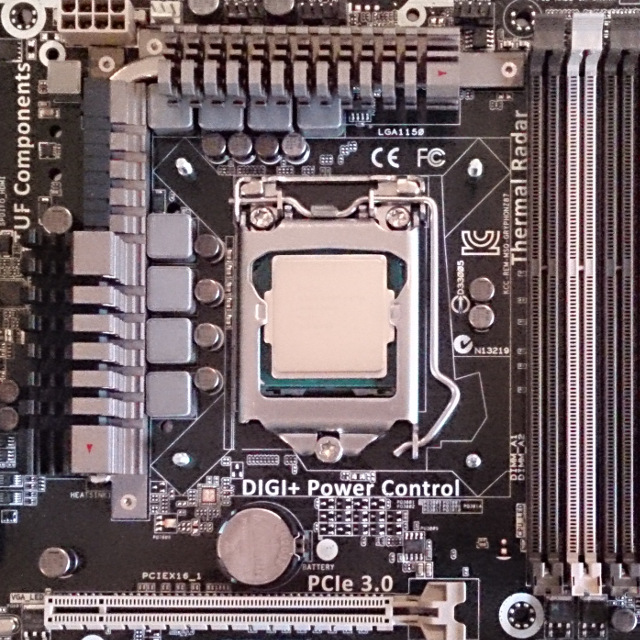
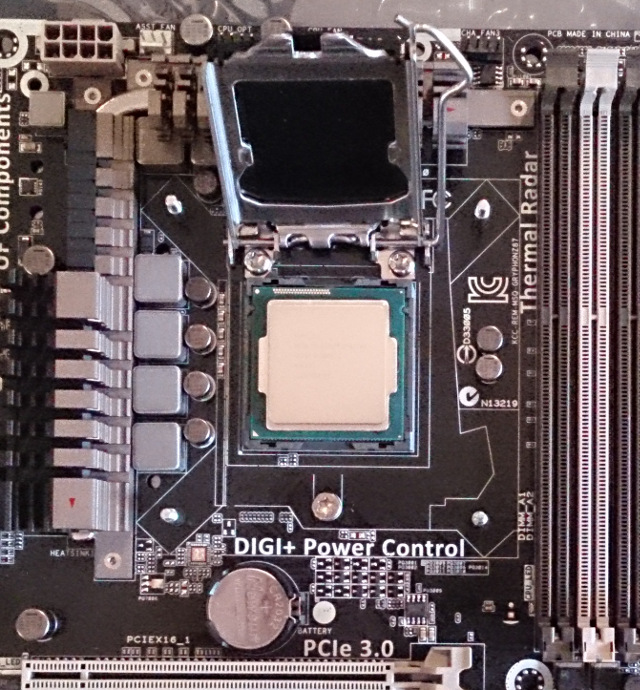
Step 2: Install the CPU
This was a nerve racking part as the CPU is the most expensive part. However it went very smoothly - I raised the leaver on the side of the socket, then holding the CPU by the edges placed the i7 4770K into the socket making sure the triangle on 1 corner aligned with the triangle on the socket corner and that the divits on each side also aligned. Next I closed the lid of the socket by returning the latch of the socket to the closed position and ensuring the front edge of the top plate slid under the locking screw.
Step 3: Mounting the CPU cooler
The Noctua NH-U12S comes with great instructions and great hardware. First I inserted the backplate from the back, then the spacers and 2 front arm brackets from the front and screwed them into place. Then I applied thermal paste (supplied with the NH-U12S) to the CPU, it is recommended to apply a small blob the size of a small pea to the center of the CPU. You should not apply too much thermal paste as too much results in inefficient thermal conductivity also you shouldn't spread the thermal paste out in an effort to make a smooth layer, as this occurs automatically when the heatsink is secured on top of the CPU. After applying thermal paste I placed the heatsink portion of the NH-U12S on top of the CPU and then secured the heatsink to the front bracket by screwing the 2 screws on the heatsink cross bar to the 2 front bracket. The 2 screws securing the heatsink to the 2 front bracket either side of the CPU are spring loaded and help to provide even pressure of the heatsink to the CPU.
The final step of installing the Noctua NH-U12S is to connect the fan power cable to the CPU_FAN header on the motherboard this is so the UEEFI BIOS can monitor and control the fans RPM
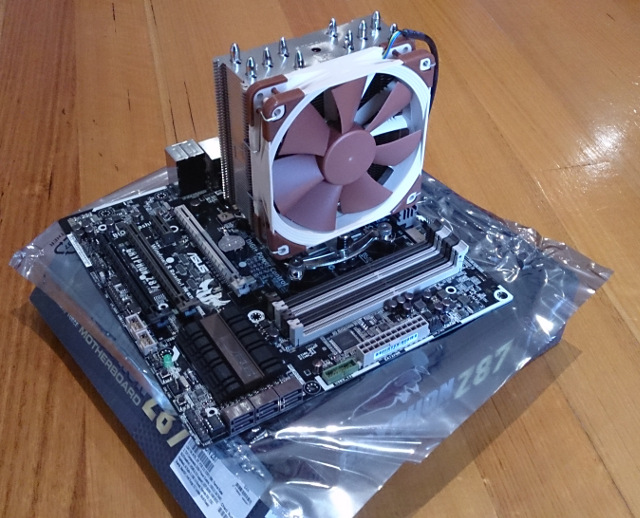


Step 4: Inserting the RAM
If not using all the RAM slots check the motherboard manual for which slots to use. When inserting RAM into a RAM slot first open the latch(s) on one or both ends, make sure the RAM is aligned correctly (it only goes in one way) and then firmly push the RAM into the slot, it should click in the the latch should lock back into place.
Step 5: Install the motherboard into the case
Install the motherboard into the case, make sure to carefully align the rear IO connectors with the IO back plate previously installed in the case. The motheboard mounting holes should align with the stand-offs installed earlier, then use the screws provided to secure the motherboard into place.
Step 6: Install the PSU & cable management
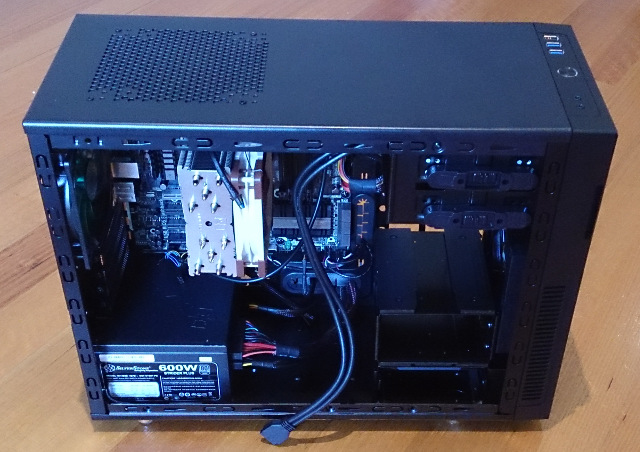
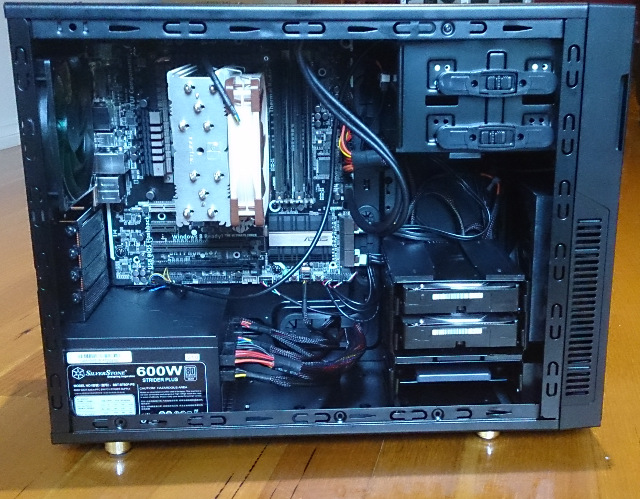
Next I installed the PSU (power supply) - at this stage the power should be off and no mains power connected. I positioned the PSU at the at the back on the bottom of the case, there are 4 rubber pads in the case which the PSU sits on this is a good little feature to stop any vibrations caused by the PSU. I orientated the PSU with the fan facing down, this is so that the PSU sucks in fresh air from the bottom. The air is exhausted out of the back of the PSU and case. The PSU is held in place by 4 thumb screws which are screwed in from the back of the case - the PSU comes with both thumb screws and regular screws so you can choose which ones you prefer to use.
At this stage you should also be thinking about cable management, that is the best way to route the cables within the case to things neat and tidy. At this stage I connected the required power cables to the PSU, (24pin motherboard power, 8pin motherboard power, SATA power cable) and routed them through the rubber grommets to the back of the case. In this photo you can see the cables connected to the PSU, as well as the 24 pin power connector already connected to the motherboard.
At this stage I connected the cables for the 2 case fans to chassis fan headers on the motherboard, I decided to use the headers on the motherboard as apposed to the integrated fan controllers in the Nanoxia Deep Silence 4 case so that the fans RPMs are controlled via the motherboarded depending on the current temperature - the fan settings can also be tuned in the BIOS.
The front panel IO connectors were connected to the motherboard, power & reset buttons, HD audio, front USB2 and in the photo the front USB3 cable is not connected yet.
Step 7: SSD, HDD and Optical drive

The next thing to do was install the SSD, HDD and Optical drive. The SSD & HDDs are screwed in to mounting brackets which then slide into the SSD/HDD cages. I removed the top HDD cage and used the bottom HDD cage for the 2 WD RED 3TB drives and the bottom single fixed HDD slot for the Samsung 840 Evo 250GB SSD. I did not need the top HDD cage as without it I still had room for my SSD and HDDs and removing it will improve the air flow from the from fan a little bit
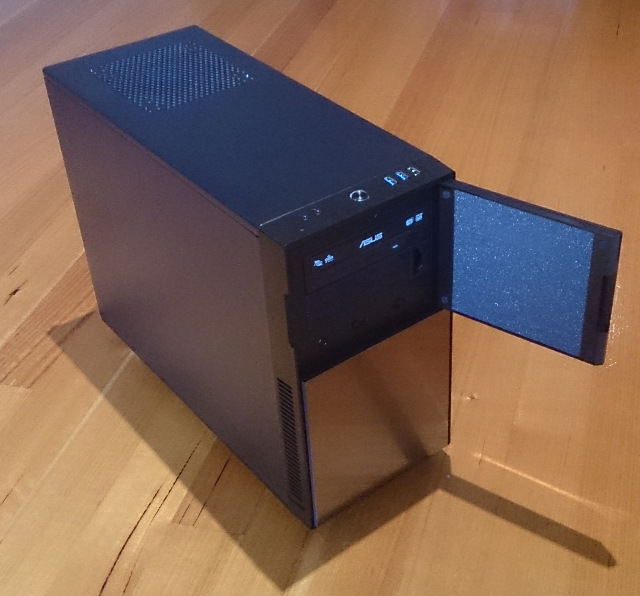
The DVD drive was also easy to install, the 5.25" cover from the top 5.25" bay was removed and the DVD drive pushed in from the front. Once in position the DVD drive is held in place by the tool-less clips on each side - simply push the clip in and slide to the locked position, done.
Once mounted each of the drives was connected to a SATA power connection to the PSUfor power, and a SATA connection to the motherboard for data transfer. Cables were routed as neatly as possible however it was not possible to route the SATA data connections behind the motherboard as due to the location of the SATA ports on the motherboard the SATA plugs partly blocked the cable routing hole, so instead I routed the SATA cables directly accross to the SSD and HDDs (as they are right next to each other) and tucked the excess cable behind the drives.
Step 8: Final checks
Once all the components were installed I double checked all the connections making sure everything was connected as it should be. Things all seemed to be in order and the build was completed!

Step 9: Turning it on!

Once final checks of the build were done I connected my monitor and the power cable, it was then time to power it on...
It power of first go and all was working well. CPU, memory and the SSD and HDDs were all correctly detected. I forgot to plug in a keyboard and mouse but once I realised I plugged them in and they were detected. Also there was a warning for the CPU fan this was just because the CPU fan RPM was below the warning threshold, this was not a problem and more a false warning as the Noctua CPU fan generally runs at low RPMs. This was later corrected in the BIOS by lowering the fan RPM warning threshold.
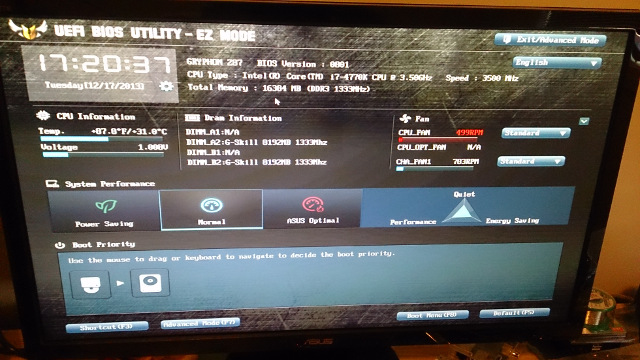
After successful power on some BIOS settings were adjusted including setting the SATA mode to RAID for the 2 WD RED 3TB HDDs. The setting were then saved and the PC reset (upon exit of the BIOS) to complete the RAID 1 configuration Ctl + I was pressed during the next boot up to enter the RAID (Intel Rapid Storage Technology) setup/BIOS, the RAID 1 was then configured for the 2 HDDs.
The final step was to load the OS, I chose to use Windows 8.1. In the BIOS I set the DVD drive to first boot priority and put the Windows DVD into the drive and restarted the PC. When it booted up again the I completed the Windows 8.1 installation. I install Windows 8.1 on the SSD and the SSD will be my OS and programs drive as this will allow windows and programs to load much faster than if they were on a regular HDD.
Conclusion
I spent considerable time selecting parts and deciding on the overall configuration of this PC and in the end I am very happy with the result. All the parts went together smoothly and were compatible i.e. CPU cooler fitted inside the case etc. For my first PC build I found working with the Nanoxia Deep Silence 4 case very straight forward, cable management was a bit tricky (but I believe this can always a bit of an issue with any build) but the Nanoxia case is well equipped with many cut out holes near the motherboard to allow routing cables behind the motherboard which helps keep things as neat as possible. The only area which was difficult to route cables well was the SATA cables as the connectors are so close to the cable routing hole that you can not bend the cables so tightly, in fact the SATA cable plug blocks some of the hole, hence you can not use the nearest hole to route the SATA cables behind the motherboard. I think this is due to the SATA sockets location on the motherboard and the fact they are right angle connectors. Oh and the front panel HD audio cable could not be routed behind the motherboard as the cable was too short.
The build quality of the Nanoxia Deep Silence 4 case is excellent it feels very strong and solid and looks nice to. Performance wise I have not done any benchmarking or overclocking yet but the PC performs well booting Windows 8.1 in just a couple of seconds and the PC is extreamly quiet - I have to check the light to know if its on. I was curious about how the temperatures would be as the case is designed to be silent and has only 2 chassis fans however the temperatures are also good, at idle CPU temperature of 31 degrees celcius (12 degrees above ambient) with the CPU fan at 300 RPM and both chassis fans at ~400 RPM.